Build a Machine Learning API With Django Rest Framework
Using Decision Trees to Predict Drug Treatment


Introduction
Finding the proper treatment, especially drug treatment, can be a difficult task. Whether you're looking for drugs to treat seasonal allergies, or you're treating a serious illness, collecting data on various aspects of patients and what treatments they best respond to can be vital for saving lives and increasing patient convenience. Here, we'll act as a data analyst compiling medical data on a set of patients all suffering from the same illness. During their treatment, each patient responded to one of five drug treatments
In this article, we'll:
- Build a simple Decision Tree model to predict Drug Treatment with relatively high accuracy.
- Create an API with Django Rest Framework that will be used to consume the Decision Tree Model created.
Build a Model
Let us start by building and saving a machine learning model that will be later used to make predictions for our API.
Dataset
Find the dataset for this model on my Github repo. The file is a CSV with data from different patients who received treatment for the same disease. The different drugs can be drugA, drugB, drugC, drugX, or drugY.
Let’s get started with the exploration of the dataset.
The first thing that should be done is to import dependencies. If you do not have the libraries installed, kindly do so before proceeding.
import pandas
from sklearn import tree
import pydotplus
from sklearn.tree import DecisionTreeClassifier
import matplotlib.pyplot as plt
import matplotlib.image as pltimg
from sklearn.metrics import classification_report, plot_confusion_matrix, plot_roc_curve
from sklearn.model_selection import train_test_split
from sklearn.preprocessing import StandardScaler
import joblib
Next, we load the dataset using pandas:
df = pandas.read_csv("https://raw.githubusercontent.com/paulwababu/datasets/main/drug200.csv")
print(df.head())
   Age Sex      BP Cholesterol  Na_to_K   Drug
0   23   F    HIGH        HIGH   25.355  drugY
1   47   M     LOW        HIGH   13.093  drugC
2   47   M     LOW        HIGH   10.114  drugC
3   28   F  NORMAL        HIGH    7.798  drugX
4   61   F     LOW        HIGH   18.043  drugY
To make a decision tree, all data has to be numerical.
We have to convert the non-numerical columns 'Gender', 'Cholesterol', and 'BP' into numerical values.
Pandas have a map() method that takes a dictionary with information on how to convert the values.
#Change string values into numerical values:
d = {'M': 1, 'F': 0}
df['Sex'] = df['Sex'].map(d)

d = {'HIGH': 0, 'LOW': 1, 'NORMAL': 2}
df['BP'] = df['BP'].map(d)

d = {'HIGH': 0, 'LOW': 1, 'NORMAL': 2}
df['Cholesterol'] = df['Cholesterol'].map(d)
print(df.head())
   Age  Sex  BP  Cholesterol  Na_to_K   Drug
0   23    0   0            0   25.355  drugY
1   47    1   1            0   13.093  drugC
2   47    1   1            0   10.114  drugC
3   28    0   2            0    7.798  drugX
4   61    0   1            0   18.043  drugY
Then we have to separate the feature columns(independent variables) from the target column(dependent variable).
The feature columns are the columns that we try to predict from, and the target column is the column with the values we try to predict.
#independent variables
features = ['Age', 'Sex', 'BP', 'Cholesterol', 'Na_to_K']
X = df[features]

#dependent variable
y = df['Drug']
     Age  Sex  BP  Cholesterol  Na_to_K
0     23    0   0            0   25.355
1     47    1   1            0   13.093
2     47    1   1            0   10.114
3     28    0   2            0    7.798
4     61    0   1            0   18.043
..   ...  ...  ..          ...      ...
195   56    0   1            0   11.567
196   16    1   1            0   12.006
197   52    1   2            0    9.894
198   23    1   2            2   14.020
199   40    0   1            2   11.349

[200 rows x 5 columns]
0      drugY
1      drugC
2      drugC
3      drugX
4      drugY
       ...
195    drugC
196    drugC
197    drugX
198    drugX
199    drugX
Name: Drug, Length: 200, dtype: object
Now we can create the actual decision tree, fit it with our details, and save a .png file on the computer:
dtree = DecisionTreeClassifier()
dtree = dtree.fit(X, y)
data = tree.export_graphviz(dtree, out_file=None, feature_names=features)
graph = pydotplus.graph_from_dot_data(data)
graph.write_png('mydecisiontree2.png')

img=pltimg.imread('mydecisiontree2.png')
imgplot = plt.imshow(img)
plt.show()
Results Explained
The decision tree uses your earlier decisions. Let us read the different aspects of the decision tree:
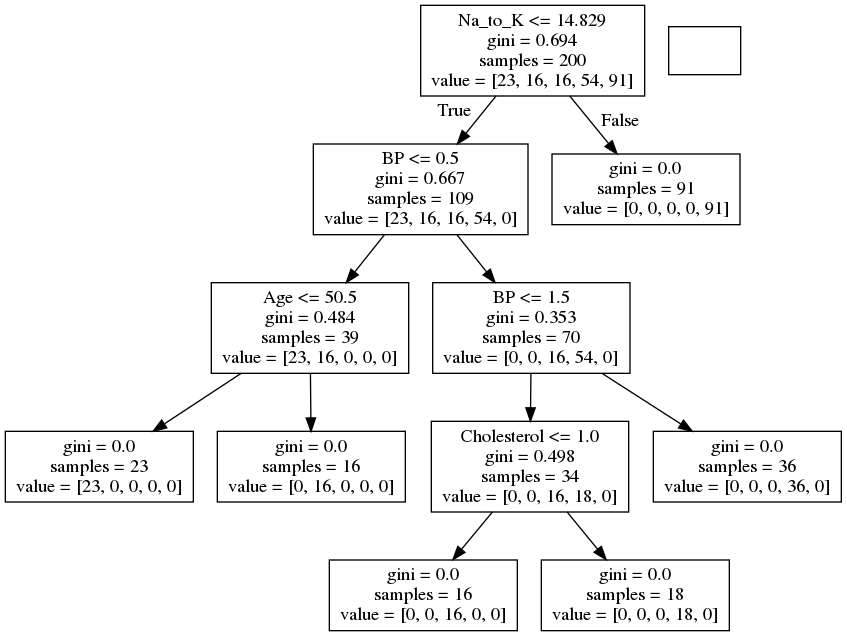
Salt to Potassium ratio (Na_to_K)
Na_to_K <= 14.829 means that every patient with a sodium-potassium of 14.829 or lower will follow the True arrow (to the left), and the rest will follow the False arrow (to the right).
gini = 0.694 refers to the quality of the split, where 0.0 would mean all of the samples got the same result, and 0.5 would mean that the split is done exactly in the middle.
samples = 200 means that there are 200 patients left at this point in the decision, which is all of them since this is the first step.
value = [23, 16, 16, 54, 91] means that of these 200 patients, 23 will get "drugY", 16 will get "drugB", 16 will get "drugC", 54 will get "drugX" and 91 will get "drugY",
Note, to know these values, we ran:
print(df['Drug'].value_counts())
drugY    91
drugX    54
drugA    23
drugB    16
drugC    16
Name: Drug, dtype: int64
Predict Values
We can use the Decision Tree to predict new values.
Example: What prescription(among the five drugs: Y X A B and C) should a 68-year-old female with normal levels of cholesterol and BP and has salt to potassium level of 27.10 take?
print(dtree.predict([[68, 0, 2, 2, 27.10]]))
# ['drugY'] will be the output
The system predicts drugY. If you follow the decision tree implemented above, you will arrive at drugY too! Sorry, I cannot explain every aspect of the decision tree, it's quite lengthy and is not within the scope of this tutorial. Let us now proceed to save the model built
# Save the model
joblib_file = "DecisionTreeModel.joblib"
joblib.dump(dtree, joblib_file)
Now we can start the Django section.
Create an API With Django Rest Framework
Following Python best practices, we will create a virtual environment for our project, and install the required packages.
First, create the project directory.
$ mkdir djangoapp
$ cd djangoapp
Now, create a virtual environment and install the required packages.
For macOS and Unix systems:
$ python3 -m venv myenv
$ source myenv/bin/activate
(myenv) $ pip install django requests djangorestframework numpy joblib scikit-learn
For Windows:
$ python3 -m venv myenv
$ myenv\Scripts\activate
(myenv) $ pip install django requests djangorestframework numpy joblib scikit-learn
Setting Up Your Django Application
First, navigate to the directory djangoapp we created and establish a Django project.
(myenv) $ django-admin startproject mainapp
This will auto-generate some files for your project skeleton:
mainapp/
    manage.py
    mainapp/
        __init__.py
        settings.py
        urls.py
        asgi.py
        wsgi.py
Now, navigate to the directory you just created (make sure you are in the same directory as manage.py) and create your app directory.
(myenv) $ python manage.py startapp monitor
This will create the following:
monitor/
    __init__.py
    admin.py
    apps.py
    migrations/
        __init__.py
    models.py
    tests.py
    views.py
On the mainapp/settings.py file, look for the following line and add the app we just created above.
INSTALLED_APPS = [
    'django.contrib.admin',
    'django.contrib.auth',
    'django.contrib.contenttypes',
    'django.contrib.sessions',
    'django.contrib.messages',
    'django.contrib.staticfiles',
    'rest_framework',#new line
    'monitor', #new line
]
Ensure you are in the monitor directory then create a new directory called templates and a new file called urls.py. Your directory structure of monitor application should look like this
monitor/
    __init__.py
    admin.py
    apps.py
    migrations/
    templates/
        __init__.py
    models.py
    tests.py
    urls.py
    views.py
Ensure your mainapp/urls.py file, add our monitor app URL to include the URLs we shall create next on the monitor app:
from django.contrib import admin
from django.urls import path, include

urlpatterns = [
    #path('admin/', admin.site.urls),
    path('', include('monitor.urls')),#monitor app url
]
Now, on the monitor/urls.py file, add our website there:
from django.urls import path
from .views import *

urlpatterns = [
    path('', Prediction.as_view(), name = 'prediction'),
]
Let’s create another directory to store our machine learning model. I’ll also add the dataset to the project for those who want to achieve the whole dataset. (It is not compulsory to create a data folder.)
(venv)$ mkdir ml
(venv)$ mkdir ml/models
(venv)$ mkdir ml/data
We also need to tell Django where our machine learning model is located. Add these lines to settings.py file:
import os
MODELS = os.path.join(BASE_DIR, 'ml/models')
Load Model through apps.py
Load your machine learning models in apps.py so that when the application starts, the trained model is loaded only once. Otherwise, the trained model is loaded each time an endpoint is called, and then the response time will be slower.
Let’s update apps.py
import os
import joblib
from django.apps import AppConfig
from django.conf import settings


class ApiConfig(AppConfig):
    name = 'api'
    MODEL_FILE = os.path.join(settings.MODELS, "DecisionTreeModel.joblib")
    model = joblib.load(MODEL_FILE)
Edit views.py
The last step is to update views.py. The views will be mainly responsible for two tasks:
- Process incoming POST requests.
- Make a prediction with the incoming data and give the result as a Response.
import numpy as np
import pandas as pd
from .apps import *
from rest_framework.views import APIView
from rest_framework.response import Response


class Prediction(APIView):
    def post(self, request):
        #data = request.data
        age= request.GET.get('age')
        gender = request.GET.get('gender')
        bp = request.GET.get('bp')
        cholesterol = request.GET.get('cholesterol')
        salt = request.GET.get('salt')
        dtree = ApiConfig.model
        #predict using independent variables
        PredictionMade = dtree.predict([[age, gender, cholesterol, bp, salt]])
        response_dict = {"Predicted drug": PredictionMade}
        print(response_dict)
        return Response(response_dict, status=200)
Test the API
To test our API, I’ll use requests library, which is the de facto standard for making HTTP requests in Python. You can also use Postman or Insomnia for making the requests.
Let’s predict what drug prescription(among the five drugs: Y X A B and C) should a 68-year-old female with normal levels of cholesterol and BP and has salt to potassium level of 27 take?
import requests
predict = [print(x) for x in requests.post("http://127.0.0.1:8000/?age=68&gender=0&bp=2&cholesterol=2&salt=27")]
{'Predicted drug': ['drugY']}
Thank you for staying tuned! In case of any questions, feel free to ask in the comment section below.